
by Teresa Shoucair
So you’ve decided to spruce up that blah looking fireplace before your company arrives for the holidays? Well, the good news is that you can do it over a weekend! Just so you know, creating a faux marble look is not the easiest process, but the result, if done well, is worth the effort. I recommend using a practice board before you start on your fireplace to make sure you understand the process.
The first step on your way to a fabulous fireplace is to find a sample of marble that you would like to mimic. It does not have to be real marble. Many of the kitchen counter tops that mimic marble are of some other material. I would start there to find what you need. Once you have found your sample, head to the paint store. You won’t need a lot of paint. For a mantel and surrounding fireplace, you are going to need approximately 4 quarts of paint and a gallon of glaze. Your paint expert can probably help match the colors on your sample to paint chips to get the best match.
Once you have chosen your colors, you also will need certain tools to do the job. The tools are not cheap, but, if you hire someone else to do the job you are probably looking at 3 to 4 times the cost. So, it will be worth the investment.
DIY Supplies:

- Blue Painters tape
- paint pan with 5 disposable liners
- 9″ paint roller, with two replacement rolls, get extension if needed
- 4 quarts of latex paint in various colors to match your marble sample.
- 1 gallon of glaze
- 1 quart of low luster polyurethane
- 4″ paint brush for latex paint
- feathers ( for creating veining) *
- 1 sea sponge
- 1 stippler brush (don’t skimp on these brushes, the better quality, the better effect)
- 1 softener brush (don’t skimp on these brushes, the better quality, the better effect)
* If you cannot find feathers you can substitute a script liner paint brush that you would purchase from an arts and crafts store.
Once you have your supplies, it’s time to start. Make sure you tape areas well that you don’t want to paint. You will need to paint your base coat first. From your sample, you should be able to determine your background color. It should be the lightest color. Again, your paint supplier should be able to help you with this one.
Day One
Step 1: Using your paint roller (make sure you cut in first with your 4″ brush) paint your basecoat and let it dry overnight.
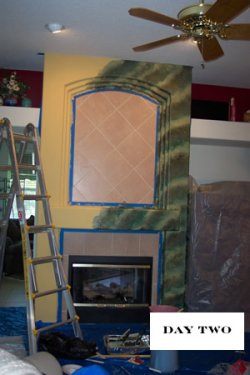
Day Two
Step 2: Mix each color with your glaze in three-to-one ratios, more glaze than paint. The glaze allows longer drying time and will thin out the paint. Remember that mixing with the glaze will lighten your paint colors by one step, so make sure you choose darker colors by one step when purchasing your paint.
Step 3: Using your 4″ paint brush, start from right to left, top to bottom, at an angle painting 6 inch lines diagonally down the area to be painted. Don’t make straight lines. If you are imitating green marble this will start to look like camouflage if it is done properly. Make sure you let some of your base coat show through. Work in small sections because the paint will dry fairy quickly even with the glaze mixture.
Step 4: Use your stippling brush to pounce the paint before it dries and blend the stripes together.
Step 5: Use the softener brush to also blend horizontally even more.
Step 6: Save your darkest color to use with your sea sponge. Wet the sponge, wring it out and dip in your dark paint. With the sponge, go over 75% of the area with the dark paint allowing the other paint colors to show through to give the varied marble look. Keep adding until it looks right to you. Use the stippling and softener brush again to blend the colors.
Step 7: When you think you are at the final stage and everything is looking good, Use your feather or script liner to create the veining.
Tip: The best way to create veins is to picture a crack in the wall. Some lines will be thick lines, some will be thin lines. Do not make straight or rounded lines. If you paint some you don’t like just use the dark paint to cover it again and try again. Let this dry over night. See Day Two Picture
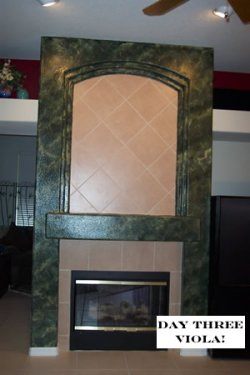
Day Three
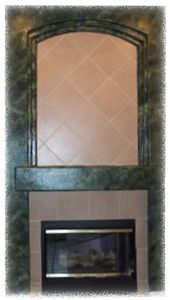
Step 8: Paint one or two coats of polyurethane over the paint to protect it from normal wear and tear and fingerprints. And you are done! You now have more than a fireplace…you also have a conversation piece and a fabulous focal point.