Last updated on February 14th, 2018 at 12:50 am
 Here’s how to make your own cat scratching post from a few pieces of lumber and a scrap of carpet.
Cat Scratching Post Supply List:
4×4 lumber, or two 2×4 pieces attached together
2×6 lumber, or something equally strong and heavy, for the base
wood screws
staples or tacks to attach the carpet
tools – hammer, saw, screwdriver, and staple gun if you’re using staples; utility knife to cut the carpet
scrap of carpet, indoor-outdoor carpet, sisal rope, or another suitable scratching surface
Caution: Wear work gloves and protective eyewear to make this woodworking project.
 Cat Scratching Post Instructions:
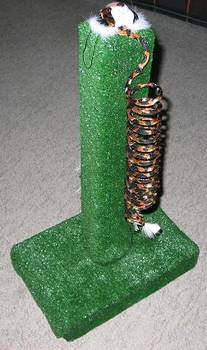
1. Cut the lumber that you are using for the scratching post to the desired height. Keep in mind that the post must be stable, as your cat is unlikely to use it again if it tips over even once. The scratching post shown here is 28″ tall, with a base of about 18″ by 12″. At minimum, the post needs to be the length of your cat plus enough extra length to allow the cat to stretch out nicely.
2. The base on this model has two layers. The first layer is made by setting 3-12″ sections of 2×6 side by side. Cut 2 sections of 2×6 to match the width of the first layer (about 16.5″ as 2×6 lumber is, in truth, only 1.5″ by 5.5″). Place these 2 sections of the second layer on top of and parallel to the first layer. Attach the top layer to the bottom with wood screws. This makes for a heavy and stable base.
3. Cover the base with your choice of scratch material, which could be as simple as an old piece of carpet or AstroTurf. Natural rope like sisal is also nice, but takes a while to wrap tightly. Attach the material with a staple gun, or a hammer and flat tacks.
4. Place the scratching post in the center of the base. Attach it to the base by using one screw on each face of the post. Cover the post with your scratch material, and attach as described for the base.
5. Secure a dangling cat toy to the new scratching post to entice your cat to try it out. If your cat likes cat nip, rub a little of that into the scratch material or attach a cat nip toy. Try placing the scratching post near where your cat sleeps, as many cats enjoy a leisurely scratch upon awakening.
How-to Article is based upon the WikiHow page How to Make a Cat Scratching Post, released under Creative Commons license.